Monday, August 22, 2011

Angel Chicken

So, did I chase you all away after my last post? Sometimes I'm not in the best mindset for blogging. I think I was in a rambling mood that day. Surprising you even got a recipe out of that! Anyway, I'm back {sort of} and trying to figure out how to make my computer time more effective so that I can share recipes more often. 

I found this recipe in a Kraft recipes magazine I got ages ago. I think it was a 2009 magazine. But I only just recently got around to trying it out. So so tasty! And the best part is this recipe is perfect for doing in the crock pot so it can be a make-ahead, too. I love those!


Angel Chicken
Recipe from Kraft

4 oz. (1/2 of 8-oz. pkg.) Cream Cheese, very soft
1 can  cream of mushroom soup
1/4 cup Italian Dressing
1/4 cup  chicken broth
2 chicken breasts, cut into bite sized pieces
1/2 lb.  angel hair pasta, uncooked
2 Tbsp. chopped fresh parsley OR 2 tsp dried parsley

Directions:
Put your chicken pieces into a frying pan with a small bit of oil. Cook on medium heat for 3-5 minutes, or until chicken is done. Turn heat down to low and cover while completing next part.

Beat first 4 ingredients with whisk until well blended; pour over chicken in pan. Simmer on medium/low for 10-15 minutes to let the flavors blend. {Alternate cooking method: put the chicken in a crock pot; cover with the cream cheese mixture. Cook on low 4 to 5 hours or on high 2 to 3 hours.}

Cook pasta as directed on package; drain. Serve topped with chicken mixture and parsley. {Note: if using the dried parsley, mix it into the chicken mixture just before serving.}

Monday, August 1, 2011

Mulligan

Okay, let's talk for a minute. The topic of discussion: life.

Now wait! Don't run away just yet.

I know it's not the most fun of conversation topics and it's really easy to get all Debby Downer on the subject. But here, I'll make it better - let's talk about my life.

Not better?

Okay, never mind.

Wait. Not never mind. Ah, what a quandary this post seems to be. You see, I want to tell you how busy I've been. I want to tell you about how I just don't ever feel like cooking in the summer. I want to show you pictures and brag about everything that's been accomplished this summer. That, my friends, is life. And sometimes, life starts a sprint race and forgets to tell you about it.

Life hasn't ever done that to you?

Oh.

Well, that's what it feels like has happened to me this summer. Never in my life have I had a busier summer. I am still trying to figure out what everyone means when they talk about summer being the perfect time to get all that reading in. I haven't hardly picked up a book in a couple months! {Okay, so this isn't entirely true. I have actually finished a few books in the last couple months. However, it feels like it's not much because it's less than normal. I'm a read-aholic. :D As if that's a real thing.}

Anywho, as I've been busy catching up to the life that took off without me, this little 'ole blog has taken the back, back burner. The one that isn't even on. It's cold and lifeless. I'm sure glad Tierra has been around to keep it going the last couple weeks. But now I'm back {hopefully!} - and with a recipe that will surely help with your "I don't feel like cooking in this hot summer weather" attitude.

Huh? That's just me, too? Okay, never mind again. Maybe I should just shut up now.

Or not! Tricked ya! Can't hush up until I've posted the recipe. And then the next time I'm back, I'll try to make sure I make sense. Thanks for sticking it out with me! I hope you've all been having a great summer!


Mulligan
Recipe from Mary Bingham

1/2 lb ground beef or turkey {I like a mix}
1 large onion, finely chopped
1/2 tsp garlic powder or 2 garlic cloves, minced
4 large potatoes, scrubbed and cut into bite-sized pieces
1 Tbsp oil
1 can sweet kernel corn, drained or 1 cup frozen sweet corn
Salt and pepper to taste {I actually really like seasoned salt with this}

Directions:
In a large skillet on medium heat, brown the ground beef; drain and transfer to a bowl or plate. Add the onion and garlic powder and mix well. In the same skillet you used to brown the burger, add the potatoes and oil; cook on medium low heat until tender, about 20-25 minutes. Once potatoes are done, add the ground beef and the corn. Cook on low for 5 minutes, or until corn in warmed through. Salt and pepper to your liking. Enjoy!

Tuesday, July 19, 2011

Tuesday with Tierra (Pepperoni Pinwheels)

Hello Everyone! What another great Tuesday :D I hope everyone is having a great summer! I havent been doing much, I got a job as I mentioned in previous blogs so therefore I have made myself available all summer.
This blog I decided to do another easy meal.... I know during Summer that sometimes we all get so busy we dont have much time to throw together a dinner. Well this one is a favorite, and after a long 13 hour shift at work its so nice to come home and throw this together.
Pepperoni Pinwheels..basically Pizza Bites! Now i will type the original recipe then in a different color some alterations i did.

Pepperoni Pinwheels
from taste of home best recipes magazine

You will Need:
1/2 C diced Pepperoni (this was not near enough for me, i like pepperoni)
1/2 C shredded mozz cheese (really any kind of cheese works)
1/4 tsp dried oregano
1 egg seperated ( i did the egg thing the first time, kinda stupid. the yolk just kind of makes it so that it stays together.. so the second time i just used marinara sauce. Then sprayed the tops with Pam... works great)
1 tube crescent rolls.

Directions:

1: In a small bow, combine pepperoni, cheese, oregano and egg yolk. In another small bowl, whisk egg white until foamy; set aside. Separate crescent dough into four rectangles ;seal perforations.

2: Spread pepperoni mixture over each rectangle withing 1/4 inch of edges. Roll up like Jelly Roll style , then cut into 4-6 pieces.

3: Place cute side down on greased baking sheets;brush tops with egg white. Bake at 375 degrees for 12-15 minutes or until golden brown. Serve Warm.


Serve with Salad or Pasta! :D

Enjoy!!

Tuesday, July 12, 2011

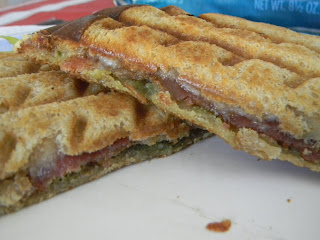
Tuesday with Tierra! (Grilled Bacon Mozz Pesto Sandwich)

Ooops!! So i scheduled this post to go on tuesday but instead i wrote the wrong date for today!!! Sorry guys!!!!
Tuesday again! I feel like since i started doing these Tuesday with Tierras, time has been going sooo much faster!! Anyway so I actually am writing this on Monday because i work from 6am to 6pm or so tomorrow and then Im usually so exaushted I cant even think! lol
So this sandwich I found on the website Pinterest, on there however it was a grilled panini but in my mind there is not much difference, so I just used bread.
Anyway when I saw this, I thought to myself.... Bacon.... Mozzerela..... Pesto!!!!! Ummm Yes Please! I call this the Adult Grilled Cheese.

The Adult Grilled Cheese

Found a picture on Pinterest and went from there

You will need:
4-6 slices of bread (depending on how many sandwiches you want)
8-12 slices of the bacon (i like bacon, so i put at least 4 slices of bacon per sandwich)
1-2 C Mozz Cheese (i also love cheese, so i put at least 1/4 C to 1/2 C cheese on each sandwich)
2-4 Tbsp Pesto (i put a tablespoon or so on each sandwich, Pesto can be very strong so put at much or little as you want)

Directions:
1: Heat the oven to 400 degrees. Line a cookie sheet with tin foil. Lay out the bacon on the sheet and put in the oven for 15 minutes or until cooked to your desire. (My sister in law showed me this way o f cooking bacon besides frying it, cause i hate the splatter and this way i dont have to worry about it!! :D)
2: Lay out the slices of bread and put Pesto on one slice per sandwich, then lay out the cooked bacon on top of the pesto, and finally the Mozz cheese. Put the other slice on top of that!
3: Now i cook my grilled cheese sandwiches on my George Forman cause i like the golden even brown it cooks and it kind of smushes it like a panini. However I am sure cooking it on that stove or however you make grilled cheese's it would work. Just cook till golden brown and cheese is melted!


Enjoy!!! I know my husband and I did a lot!! :D

Tuesday, July 5, 2011

Tuesday with Tierra! (Cheesy Bacon Penne)

Hello All!!! I hope you all had a fabulous 4th of July! I would like to apologize for not posting a blog last week, as Jessica explained I had worked for 13-14 hours and was exhausted. I will do my best to schedule blogs now lol However, thank you Jessica for posting a blog in my place!! :D
This weeks blog is amazing! It became a new favorite of mine and my hubbys!
I found this recipe in Taste of Home 100 Best Recipes and let me tell you so far so good out of the recipes I have tried in there.
Now I love Mac and Cheese. I am like a little kid with how much I love Mac and Cheese, but I am pretty picky about it. I have tried making many different kinds to find that perfect homemade cheese sauce and I think I might have finally found the perfect sauce and shoot add bacon to it and BAM! it is bound to be awesome! lol
Cheesy Bacon Penne
4-6 Servings

You Will Need:
2 C uncooked penne pasta
1 Garlic clove, minced
2 Tbsp flour
1/4 tsp pepper
2 C milk
3 C shredded cheddar cheese
1/2 C crumbled cooked bacon

Directions:
1:Preheat oven to 350 degrees.

2: Cook pasta according to package directions. Meanwhile, in a large saucepan, saute garlic in butter for 1 minute. Stir in flour and pepper until smooth; gradually add milk. Bring to a boil; cook and stir for 1-2 minutes or until thickened. Reduce heat; stir in 2 cups of cheese until melted. Remove from the heat.

3: Drain pasta; add pasta and 1/3 C bacon to cheese sauce. Transfer to a greased 2-qt. baking dish. Cover and bake for 30 minutes. Uncover and sprinkle with remaining cheese and bacon. Bake 5-10 minutes longer or until cheese is melted.


Enjoy!!

Monday, July 4, 2011

IHOP French Toast

HAPPY INDEPENDENCE DAY!!

I am currently away and don't really have a great Independence Day recipe to share. Maybe next year. But this recipe works, says I. It is, after all, a recipe patterned after the french toast served at IHOP, which is a quintessential American restaurant. Right?

This french toast recipe has a special something that makes it taste really good. It's a simple ingredient but it's effective. We love this french toast around here. In fact we love it so much, it's the only kind we make! Yum yum!


IHOP French ToastRecipe from The Sisters Cafe

2 eggs
½ c. milk
1/8 tsp salt
1 1/2 tsp vanilla
3 T. flour
6 slices of thick sliced French bread
Nutmeg

Directions:
First beat eggs, then add remaining ingredients with electric mixer. Mix well.
Dip both sides of bread slices in the egg mixture and place in hot buttered pan. Sprinkle the uncooked side with nutmeg. Flip over when browned.
Serve with any desired syrup, jam, sprinkled with powdered sugar, or with berries and whipped cream. Yum!


I hope you enjoy your festivities. May you have a wonderful day with family celebrating the glorious freedoms we enjoy.

Sunday, July 3, 2011

Hootenany Pancakes

If you tried, you could probably find hundreds of German Pancake recipes around the internet. I don't even think you would have to look very hard to find them. It's because these pancakes are so delicious and soooo fun! I can guarantee you that any child would go crazy over these puffy pancakes. When I was growing up, we called them Hootenany Pancakes. My husband had never heard of such a thing and finally convinced me to make some German pancakes. Low and behold! They are the exact same thing! But since Hootenanny is a whole lot more fun to say than German, I'm sticking with the name I grew up with!


See all that yummy puffiness? Delicious!

Hootenanny Pancakes
Recipe from Bingham Family

1/4 cup butter
6 eggs, well beaten
1 cup milk
1 cup flour
1/2 tsp salt
1/2 tsp sugar

Directions:
Preheat oven to 400 degrees.
Melt 1/4 cup butter in a 9x13 in your warm oven.
While the butter is melting, mix all remaining ingredients together for one minute. When butter is melted, pour batter into the pan and bake for 20-25 minutes, or until the edges are golden brown and puffy.

Saturday, July 2, 2011

Brown Sugar Muffins

I am a muffin girl. I loooooovvee muffins. I could eat them for every meal. Sometimes I do. Especially if they are these muffins. I think these are quite possibly my most favorite muffins on this planet {that I've tasted anyway - I haven't tried each of them, after all}. In fact, that's all I can't think of to say about these. They are my favorite. You should try them. Maybe today. Like, right now. Heck, I think I'm going to go make them right now. Except that I'm not home. This here post, it was scheduled. Because I promised you a breakfast week, did I not? And since I'm gone today, the only way to keep that promise is to schedule my posts. Look at me being all organized. Everyone go look at the sky tonight. The moon is probably blue.

But, since I'm visiting my mother-in-law and this recipe is originally hers, maybe I can get these muffins after all. :)


I know, it's not the greatest photo. I took this ages and ages ago. So please forgive me. Next time I make them, I'll try to remember to take a better photo. :)
 Brown Sugar Muffins
Recipe from Olive Harwood

2 cups flour
1 cup brown sugar
1 tsp baking soda
1/4 tsp salt
1/2 cup butter, softened
1 egg
1 cup milk
1 tsp vanilla

Directions:
Preheat oven to 400.
Mix dry ingredients in a medium bowl. Make a hole in the middle of the mixture. Set aside.
In another medium bowl, combine all the wet ingredients. I generally find that it works best if I combine my egg and butter first, then the other things. It also works best if your egg and milk are at room temperature so the butter doesn't suddenly harden up when the cold ingredients hit it. But these always turn out fine without getting everything to room temperature, so honestly, I usually don't worry about it.
Pour wet ingredients into the hole you made in your dry ingredients. Mix just until moistened.
Drop into well oiled muffin pan about 2/3 full. Bake for 25 minutes or until golden brown.

Friday, July 1, 2011

Country Sausage Gravy

This country gravy is beautiful. If you put it on top of some biscuits you have a lovely meal just waiting to be eaten. The nice thing about this gravy is that it's quick {notice a theme this week?}. You can prepare and cook this gravy while your biscuits are baking in the oven. Ah, pure loveliness, right there.

This recipe comes from the Food Nanny. Has anyone ever heard of her? She has a fantastic meal planning site that has everything you could possibly think of needing as you prepare your meals. You should really look into it. I guess she also has a television show about saving dinner {I haven't seen it because we don't get television}. I've looked up a little bit about her and she looks like the sweetest woman and has some great ideas. Check out her website if you want some meal planning help.


Here is a quick photo example of how to make a roux.

This gravy recipe uses what is called a roux {pronounced 'roo'}. A roux is a mixture of fats {especially butter} and flour to create a thickener for sauces and soups. A roux is made by melting butter in a pan and adding the flour. The butter will absorb the flour. It is important to continually stir the roux so it doesn't burn. Once the flour is absorbed by the butter, you continue to stir until the roux reaches the desired color. For this gravy, you just allow it to slightly darken - like a blond roux. If you'd like more step-by-step directions, you can find some here. This may sound like this gravy is complicated, but it's really not. There is just a fancy word associated with melting butter, adding flour, stirring until it reaches a certain color. Anyone can do it. And once you do, you can impress all your friends with your roux making abilities. :)


Sausage Country Gravy
Recipe from The Food Nanny Rescues Dinner

8 oz sausage
1/4 cup butter
1/3 cup flour
2 cups milk
1 cup water
1 tsp salt
1/2 tsp black pepper

Directions:
Cook and stir the sausage in a small skillet over medium heat, crumbling it with spoon. Drain the fat, if necessary.
Melt the butter in a medium saucepan over medium heat. Stir in the flour, stirring constantly to prevent scorching. I found that using a whisk is the easiest way to get the roux a nice consistency, without clumps. Cook until the roux begins to darken slightly. Slowly whisk in the milk, water, salt, and pepper. When this says slowly, it really means ssslllooowwwlllyyyyyyy. Just mix in a little at a time. The faster you dump all this liquid in the pan, the thinner your gravy will be. If you want a thick gravy {and trust me, you want a thick gravy}, stir it in slowly. Continue stirring until the gravy thickens and comes to a simmer. Stir in the sausage.
Break the warm biscuits in half and cover with the gravy mix. Mmm, I can just smell the deliciousness!


Thursday, June 30, 2011

Flaky Buttermilk Biscuits

These other biscuits are also delicous. It's actually hard for me to decide which of the two are more delicious. Does a person have to choose something like that? I hope not because I'm choosing not to. :)


These biscuits take a bit more work but it really depends on what you are going for. These are flaky biscuits and they have a lovely, light texture. I love the honey as a sweetener. It adds a special something to these that is missing in a traditional biscuit. And the flaky-ness of them makes them even better! They are actually quite perfect and I kind of think that the only way you could mess them up would be to bake them too long until they turn black. Not that I would know from any kind of experience or anything. I'll just stop talking now.

Wait, no I won't! I have a recipe to share! {Yes, I'm a dork. Why would you ask?} I have a few things I'll be explaining along the way so be patient with me as we go. I promise they are worth it!

*Note: If you do not usually buy buttermilk {like me} you can "make" some really easily. Put a tablespoon of lemon juice or white vinegar into a one cup measuring cup. Fill the rest of the space with milk. Allow to sit for about five minutes. Now you have a nice equivalent to buttermilk that works beautifully in recipes.

Now, I know these biscuits don't look like much in the photo. It's really pathetic, actually. I didn't follow the recipe as well as I should have {notice all the notes throughout the recipe} and they didn't rise as they should have. Seriously, don't work this dough too much. You'll get sad biscuits like mine. Also be sure to take them out of the oven when the timer goes off. That usually makes for better biscuits, too.


Deliciously Flaky Buttermilk Biscuits
Recipe from The Sisters Cafe

2 cups all-purpose flour (9 ounces)
2 1/2 teaspoons baking powder
1/2 teaspoon salt
5 tablespoons chilled butter, cut into small pieces
3/4 cup fat-free buttermilk {see note above}
3 tablespoons honey

Directions:
Preheat oven to 400°.
Weigh or lightly spoon flour into dry measuring cups; level with a knife. {It is important to lightly measure your flour because it helps keep the biscuits light.} Combine flour, baking powder, and salt in a large bowl; cut in butter with a pastry blender or 2 knives until mixture resembles coarse meal. Chill 10 minutes.
Combine buttermilk and honey, stirring with a whisk until well blended. Add buttermilk mixture to flour mixture; stir just until moist. Don't stir too much! You don't want those biscuits to get tough.
Turn dough out onto a lightly floured surface; knead lightly 4 times. {Only that many. I swear you'll be sorry if you do more. Remember the whole tough and sadly unrisen biscuit thing.} Roll dough into a (1/2-inch-thick) 9 x 5–inch rectangle; dust top of dough with flour. Fold dough crosswise into thirds (as if folding a piece of paper to fit into an envelope). Reroll dough into a (1/2-inch-thick) 9 x 5–inch rectangle; dust top of dough with flour. {Don't worry about making all the dough stick together as you continually roll it out. Leaving the layers creates the flakiness of the biscuit.} Fold dough crosswise into thirds; gently roll or pat to a 3/4-inch thickness. Cut dough with a 1 3/4-inch biscuit cutter to form 14 dough rounds. Place dough rounds, 1 inch apart, on a baking sheet lined with parchment paper or well greased. Bake at 400° for 12 minutes or until golden. Remove from pan; cool 2 minutes on wire racks. Serve warm.

LinkWithin

Related Posts with Thumbnails