Showing posts with label Chocolate. Show all posts

Monday, June 25, 2012

Double Chocolate Cheesecake

I mentioned last week that my hubby always gets cheesecake for his birthday. Seriously lucky guy. ;) I also mentioned that last year he got a Double Chocolate Cheesecake for his birthday. It's only taken me a year to get to it, but I'm finally sharing that recipe with you!

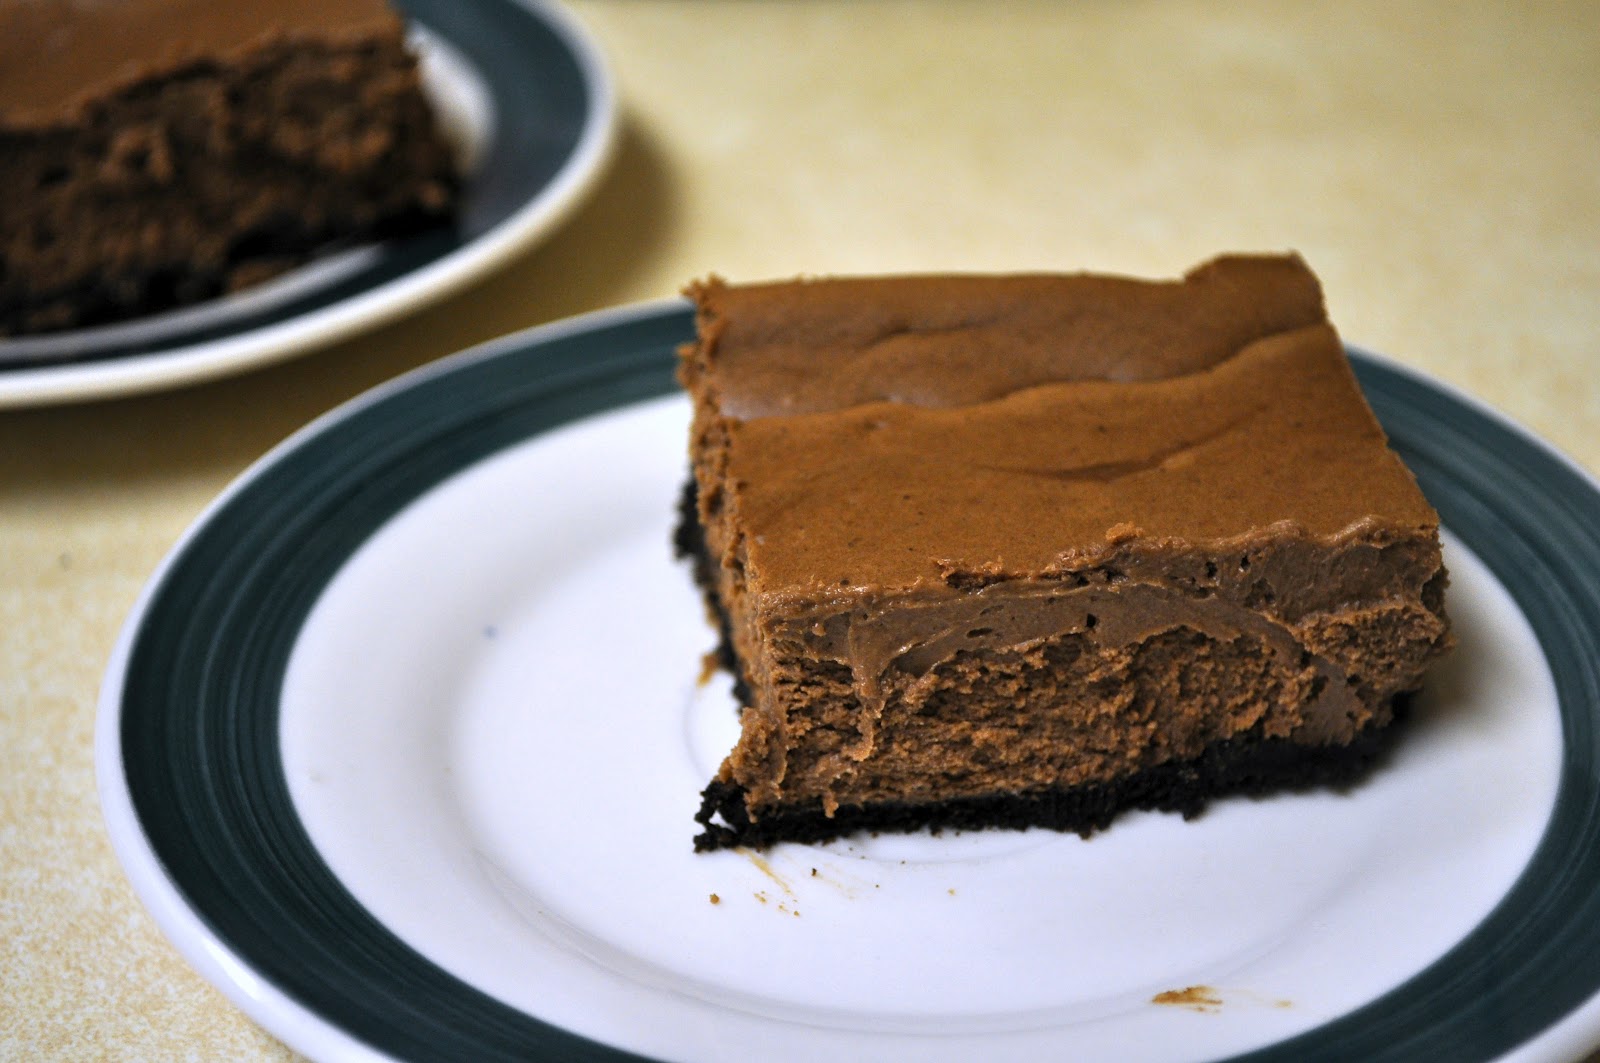
This cheesecake is super rich and decadently chocolate. It was almost too much for me. But for all you chocolate lovers out there, this is fabulous stuff! It's also not too difficult as far as cheesecakes go. You just beat everything together, pop it in the oven, bake it up and let it set. Then eat. :) Because it's so rich, I think some unsweetened whipping cream would be really tasty on top. Or some blueberries or blackberries to help break up the chocolate. Of course, some people don't mind the chocolate and if you're one of those people, then eating it without anything topping it might be the way to go!


Double Chocolate Cheesecake
Recipe from Kraft
Time: 20 minutes, plus refrigeration
Makes: 16 servings

24 chocolate sandwich cookies, crushed {about 2 cups}
1/4 cup butter or margarine, melted
4 pkg cream cheese, softened
1 cup sugar
2 Tbsp flour
1 tsp vanilla
1 pkg (8 squares) Baker's semi-sweet chocolate, melted and cooled {any other brand of baking chocolate would also work, this just seems to be the most popular brand}
4 eggs

Directions:
Heat oven to 325. Mix cookie crumbs and butter; press into the bottom of a 9x13 pan lined with foil. Bake for 10 minutes.
Beat cream cheese, sugar, flour and vanilla with mixer until blended. Add chocolate; mix well. Add eggs, 1 at a time, mixing on low after each addition, just until blended. Pour over crust.
Bake 45 minutes or until center is almost set. Cool. Refrigerate 4 hours. Use foil to life cheesecake from pan. Top with berries or whipping cream.

Tuesday, December 13, 2011

Holiday Sugar Rush: Fudge Crinkle Cookies

Fudge Crinkle Cookies
Recipe from Betty Crocker Cookies

Makes: approx 2 1/2 dozen cookies

1 box devil's food cake mix {a mix with pudding is the best}
1/2 cup butter, melted
2 eggs
1 tsp vanilla
1/3 cup powdered sugar

Directions:
Preheat oven to 350 degrees.
In a large bowl, mix cake mix, oil, eggs and vanilla with a spoon until a dough forms.
This next step is easier if you refrigerate your dough for about 15 minutes, but it isn't absolutely necessary.
Shape dough into 1-inch balls. Roll balls in the powdered sugar. Place balls about 2 inches apart on an ungreased cookie sheet.
Bake 10-12 minutes, or until set. Allow to finish setting up on the cookie sheet for one minute, then remove to a cooling rack. Cool completely, about 30 minutes. Store tightly covered.

Wednesday, November 24, 2010

Mile High Chocolate Cream Pie

Disclaimer: I didn't actually taste this pie. I know it's abominable to even post a recipe that I myself did not try. But in my defense, when I made this pie I wasn't really feeling very well so I made it and sent it away. However, I was told that it was really yummy!
 
This is called "mile high" for a very good reason - this pie is soooo tall!! You will not believe how much pie you will get when you make this. But it is easy which can be super nice with all the holiday hubaloo that keeps you so busy!


Mile High Chocolate Cream Pie
Recipe found at Instructables
Time: 20 minutes + at least 6 hours refrigeration
Makes: 1 pie or 8 servings

Ingredients:
1 Graham Cracker Crust {use the good kind so your pie doesn't fall apart}
2 3/4 cups Milk, separated
2 envelopes Dream Whip {there are four envelopes in one box, which you can find next to the pudding in your grocery store}
1 small box instant chocolate pudding
1 small box instant butterscotch pudding
1 tsp. vanilla extract
1 8oz tub cool whip
-You'll also want an electric mixer unless you can hand mix something for about 8 minutes!

Directions:
Put one cup cold milk, 1 tsp. vanilla extract and two envelopes dream whip in a large bowl. Mix on high for about 6 minutes or until you get stiff peaks. I stopped the mixer every two minutes to scrape the bowl.

Now add the two boxes of pudding mix and 1 3/4 cups milk to the mixture. Mix on slow for one minute until combined. Scrape the bottom and sides of the bowl. Then mix on high for two minutes, scraping the bowl once more half-way through. When finished, the mixture should be stiff.

Pour the mixture into your graham cracker crust and put in the fridge. The longer it is there, the more set-up it will be. I would say that you could probably get away with 4 hours though more is certainly good.
Once pie is completely set-up, spread the cool whip on the top.
You can add sprinkles, chocolate syrup, crushed chocolate cookies or chocolate curls to the top.
You can also do like we did and just add the cool whip to the top of each individual piece rather than spread all the cool whip on top. I just couldn't handle the idea of that much cool whip on the top of one pie, plus the fact that you would have a hard time getting your pie out of the pan if it were that high!


Variation: you could use the sugar-free forms of pudding and skim milk to make this a relatively low-fat, low-sugar dessert.

Wednesday, October 13, 2010

Buckeye Bars

These are some delish bars that I made up to put on neighbor's Christmas goodie plates a couple years ago. Terrible that it's taken me this long to share the recipe with you! I found the recipe in a Kraft recipe book. One of the best things about this recipe is you can make it ahead of time and freeze it to keep for when you need it. 
I do apologize about my photo. I know it pretty much stinks. I promise they tasted good!

Buckeye Bars
½ cup (1 stick) butter, softened
¾ cup crunchy peanut butter
22 vanilla wafers, crushed (about ¾ cup)
2 cups powdered sugar
½ of 8oz tub of whipped topping (do not thaw)
3 squares of semi-sweet baking chocolate {I prefer milk chocolate}

Directions:
Line an 8-inch square pan with foil, with ends of foil extending over sides. Beat butter and peanut butter with mixer until blended. Add wafer crumbs; mix well. Gradually add sugar, mixing well after each addition. Press onto bottom of prepared pan.
Microwave frozen whipped topping and chocolate in microwaveable bowl on high for 1 minute; stir. Microwave for 15-30 seconds more or until chocolate is melted; stir until blended. Pour over peanut butter layer; spread to cover peanut butter layer.
Refrigerate for 2 hours. Use foil handles to lift dessert from pan before cutting.
Can be made ahead and stored in the freezer in an airtight container for up to one month. Thaw in the refrigerator before serving.

Tuesday, October 12, 2010

Homemade Twix Bars

I am not a chocolate lover. Anyone who knows me knows this is true. But lately, I just can't seem to get enough Twix candy bars. Awful. Horrible. Weird. I know. So I decided to try my hand at these homemade Twix bars. Naturally they are different from what you'll buy in the store - I'd dare say they are better! Super yummy and really pretty easy to make.

Homemade Twix Bars

Crust:
1 ¼ c. flour
1/4 c. sugar
1/2 c. butter; room temp


Caramel:
½ c. butter
½ c. brown sugar
2 Tbsp. corn syrup
½ c. sweetened condensed milk


Crumble crust ingredients together {if your butter is still slightly cold instead of at room temperature, you'll find it easier to get everything crumbled together}. Be sure it's mixed very well. You don't want any large pockets of  butter making things difficult. Pack into 9x9 inch pan that has been sprayed, lined with foil and sprayed again {I didn't spray my foil and didn't have any problems}. Bake on 350 degrees for 15-20 minutes. Note: I used an 8x8 inch pan and everything was a little bit thick. If you don't think you'll like thick crust or caramel, just reserve some of the crust or filling from the pan or try to cut down the ingredients.

Put the butter for the caramel filling in a heavy saucepan and melt. Combine remaining ingredients. Bring to a boil over medium heat. Boil 5 minutes, stirring constantly as it burns easily {I'm no culinary expert but my caramel was cooked too long. I would suggest timing the boiling as soon as you see little bubbles form - this way, it should still be slightly soft but cooked enough to remain firm. I timed it from when it was really boiling and my caramel was too hard}. Remove from heat. Stir with spoon slowly until it shows signs of thickening {about two minutes or so}. Pour over crust and let cool a little.


Top layer:


Melt approximately 1-2 c. chocolate chips with 1 tsp shortening over low heat or in the microwave {because my pan was 8x8 I used 1 cup of chocolate and thought it was plenty}. Pour over caramel layer and spread carefully. Chill. Cut into bars.

Wednesday, February 17, 2010

Chocolate Chip Cookies _ 1

This is a pretty basic chocolate chip cookie recipe I got from my mom - but it's a good one. The cookies have a really yummy flavor and they cook up nice and soft, just the way a cookie should be. I like 'em!

Chocolate Chip Cookies
Diane Hardy Makes: 5 dozen cookies

1 cup butter or margarine
½ cup sugar
½ cup packed brown sugar
2 eggs
1 tsp. soda
1 tsp. salt
1 tsp. vanilla
2 cups flour
1-2 cups chips {I've used all flavors of chips as well as M&M's and they turn out great!}
½ cup nuts {optional}

Directions:
Cream together first 7 ingredients. Mix in remaining ingredients. Drop by tsp. full 2 inches apart on a greased cookie sheet. Bake at 375oF for 12-15 minutes or until lightly browned {if you notice your cookies are starting to spread too thin while they are baking - I hate it when that happens! - try adding a bit more flour to the dough so it stays thicker}.

Fun Variation:
Instead of putting in choclate chips or some other such "normal addition", try putting miniature marshmallows and then baking them up. You gotta use a lot of marshmallows or it really doesn't make a difference. It's a really fun twist to the normal cookie - and kids love it {I really loved the way they turned out}!

Tuesday, February 16, 2010

Brownies in a Cloud

WARNING: The richness of these brownies has earned them the name "sinful" among my family for good reasons. Be aware of sudden addictions and disappearing acts when these brownies are made, as well as prepared for more compliments than you dare count.

If you are not a marshmallow fan, these may not be for you. But for everyone else, prepare to be amazed! Even I will eat these and that's saying a lot since I don't like chocolate. The recipe for the brownie is wonderful: perfectly moist but not too cake-y; the marshmallows add that something special that every brownie should have {every brownie should have something special, right?}; and the frosting is the very best frosting ever! I use it all the time because I just love how delicious is turns out each time I make it. Go knock yourself out!


Brownies in a Cloud
Karlene Cobbley
Brownies:
2 cubes softened butter
2 cups sugar
1/3 cup cocoa
4 eggs
1½ cups flour
2 tsp. Vanilla
1 cup nuts {optional - I've never added these and it's a decision I have never regretted}

Directions:
Combine butter, sugar and cocoa; blend till smooth. Add eggs one at a time; mix well. Add flour slowly, beat until smooth, and then add vanilla. Pour in a greased 9x13 pan. Bake @ 350o for 30 minutes.

Clouds:
While brownies are still hot {before taking them out of the oven}, cover with miniature marshmallows {don't be shy about that covering bit either - go ahead and dump bunches of marshmallows on there} and bake until they are light brown or melted {about 3 minutes}. Let cool completely.

Frosting:
Combine all together and beat until smooth

2 cups powdered sugar
1½ - 2 Tbsp Cocoa
½ cube soft butter
¼ cup milk

Wednesday, July 22, 2009

White Chocolate Raspberry Cheesecake Bars

I made this cheesecake for Dan’s birthday and then again about a week later for a get-together with some friends. Even though I don’t like chocolate {yes, the truth finally emerges!}, I still really liked this cheesecake {I just didn’t eat the crust!}. I discovered after having this cheesecake that I really enjoy baked cheesecake, and probably even like it better than non-baked cheesecake. It’s not too difficult to make and it tastes and looks super yummy!


White Chocolate Raspberry Cheesecake Bars

Prep: 20 min – Total 4 hrs., 48 minutes
Makes 9 servings, 2 bars each


Ingredients:
12 Oreo Cookies, finely crushed
2 Tbsp butter, melted
3 squares white chocolate, divided
2 pkg. (8 oz. each) cream cheese, softened
½ cup sugar
1 tsp. vanilla
2 eggs
¼ cup red raspberry preserves

Directions:
Heat oven to 350 degrees. Mix cookie crumbs and butter {I just mixed mine right in the pan that you'll put it in - saved on dishes!};

press onto bottom of 8-inch square pan.

Melt 2 chocolate squares as directed on package.
Beat cream cheese, sugar and vanilla with mixer until blended. Add melted chocolate; mix well. Add eggs, 1 at a time, mixing on low speed after each just until blended.

Pour over crust.

Bake 25-28 minutes or until center is almost set.

Cool 5 minutes {this may be rather unethical, but I think it works better to be sure it's cooled and to make the preserves spread better if you put in the refrigerator for about 5-10 minutes - I didn't do that with the one in the picture and you can see it wasn't staying together very well - the refrigerated one worked without a cinch}; spread with preserves.

Melt remaining chocolate square; drizzle over cheesecake. Cool cheesecake. Refrigerate 4 hours. Cut into 18 bars.
Kraft Food and Family, Holiday 08/Winter 09 edition, pg. 35

Tuesday, February 3, 2009

Extraordinary Chocolate Chip Cookies

I can't remember for sure, but I believe I got this recipe from Kraft. And they really live up to their name! They are truly extraordinary!

Need:
  • 1 & 1/4 cup granualated sugar
  • 1 & 1/4 cup packed brown sugar
  • 1 & 1/2 cup softened butter
  • 1 tablespoon vanilla
  • 1/2 cup shortening
  • 2 eggs
  • 4 cups all-purpose flour
  • 2 tsp. baking soda
  • 1 tsp. salt
  • 1 bag chips (24 oz) I didn't even come close to using this many
Directions:
- Heat oven to 350 degrees. In large bowl, beat sugars, butter, shortening, vanilla & eggs with spoon. Stir in flour, baking soda & salt. Stir in chocolate chips.
- On un-greased cookie sheet, drop dough by rounded measuring tablespoonfuls about 2 inches apart.
-Bake 12-15 minutes, or until light brown. (it only took about 8 minutes in my oven) Cool slightly. Remove from cookie sheet to a cooling rack.

Makes:
About 5 dozen cookies

As you can see, I made these cookies with mint and chocolate chips. That turned out really well.

LinkWithin

Related Posts with Thumbnails