Showing posts with label Fruit. Show all posts

Saturday, June 23, 2012

Light and Fluffy No-Bake Cheesecake

My husband recently celebrated a birthday. Birthdays are kind of a big deal to me. I love to go all out for birthdays, have fun traditions and celebrate like crazy. For my husband's birthday, which fell on a weekday this year, I actually got up early and prepared a huge breakfast - and I am talking huge. Pancakes, eggs, bacon, sausage, fruit. Now you all know I love me some breakfast food, but I don't love getting up super early just to prepare it before the day even gets started, so I rarely make breakfast foods for breakfast. But the fact that I prepared a huge breakfast for my hubby for his birthday is pure testament to the fact that I love birthdays -- and that I love my husband, of course. :)

You may have noticed that the title of this post indicated a recipe for cheesecake would be included. And you may be thinking that I also included cheesecake in the lineup of delicious breakfast treats. I didn't, don't worry. But we did have cheesecake for hubby's birthday cake that evening {after we had completely gorged ourselves on Famous Dave's brisket and barbequed chicken - they have an awesome e-mail club and sent us a fantastic "gift" for hubby's birthday. We really enjoyed it! [just a note: Famous Dave's is not promoting this post or blog in any way. They don't really even know I exist. We just like their food and we especially love good deals.] man, I love birthdays!}. I'm not sure how this tradition got started or why, but I always fix a cheesecake of some kind for my hubby's birthday. A few years ago I made White Chocolate Raspberry Cheesecake Bars for his birthday. Last year I made a Double Chocolate Cheesecake {recipe to be posted soon!}. See what I mean? Lots of cheesecake! This year I made what could possibly be his favorite cheesecake ever - a recipe his mom made for them growing up. I'll admit it, I'm a huge baked cheesecake fan, so I don't make this recipe often {in fact, I've only ever made it once before}. But, the hubby loves it and it is a lot easier than a baked cheesecake. Sometimes, even though I love birthdays and love going "all out", I need something a little easy.

This cheesecake is positively light and fluffy. It's perfect for the summer when you want a little something sweet while still keeping cool. It is also perhaps the easiest cheesecake you'll ever make in your life. So do yourself a favor and make it up. :)


Light and Fluffy No-Bake Cheesecake
Recipe from Olive Harwood
Time: approximately 1 - 1 1/2 hours, including refrigeration time
Makes: 12-16 servings, depending on how big you cut your pieces

1 can evaporated milk, chilled in the refrigerator for at least a couple hours {though I just let mine chill overnight}
1 small package lemon Jell-O
1 Tbsp lemon juice
1 cup water
1 pkg cream cheese, softened
1 cup sugar
1 tsp vanilla
16 graham crackers
Topping of choice - options include pie fillings, Danish dessert, or fresh fruit

Directions:
Take your graham crackers and chop them up really fine in a food processor. If you don't have a food processor, put them in a plastic baggie and crush them really good with a rolling pin or something else hard. You want them to be super fine crumbs. This is the crust and large chunks of graham cracker just won't be as good. Once they are chopped up nice and fine, pour them into a 9x13 pan and spread them evenly. Set aside.
Get your cup of water to boiling. Add the lemon jell-o and the lemon juice. Stir until dissolved. Set aside and allow it to begin setting up. You want it to get about to the consistency of egg whites. This takes around 30 minutes, depending on how quickly it cools, but still keep an eye on it. Once it starts to set up, it does so quickly. You won't want it to fully set up because then you'd have to start over. No one wants to have to start over.
Beat the cream cheese, sugar and vanilla until creamy and light.
Whip the cooled evaporated milk until nice and frothy. Add the jell-o and cream cheese mixtures. Beat until fully incorporated and fluffy.
Pour over the graham crackers you placed in your 9x13 pan. Allow to set for 30-60 minutes before topping.

Thursday, June 21, 2012

Lemonade Cheesecake Pie

Remember that sinful, sugary, sweet, delicious goodness I was talking about in my last post? Yes, this is one of those recipes. If you are on a diet, I highly recommend turning away right now because this recipe might just ruin it for you.

 Look away! Quick!

See how beautiful that looks? Ah. Now, if you didn't look away and you are now tempted to trash your diet and make this delicious looking pie, don't say I didn't warn you. ;)


I don't know what it's like in your neck of the woods, but in mine it's starting to get warm. I have to admit that I really love me some dessert. Also, I'm a baker. I love to bake. But in the summer time, turning on my oven usually means adding at least 3-4 degrees of heat to my entire house and when you struggle to keep your house at a liveable, breathable temperature as it is, those extra degrees are not often worth the sacrifice. So I try not to bake in the summertime. But then I get this itch and have a super strong desire to make something, anything, and I have to find some way to fill the baking void that has been made in my life. Desserts like this kind of save me. I can make something and feel fulfilled - and get the dessert I often am sure I desperately need.


Lemonade Cheesecake Pie
Recipe from Kraft

Total time: 10 minutes, plus refrigeration
Makes: 8 servings

1 pkg cream cheese, softened {trust me when I say you won't want reduced fat...your cheesecake will be runny and mushy and not very pretty ... not that I know anything from first hand experience}
1/2 cup thawed frozen lemonade concentrate
1 tub cool whip, thawed and divided
1 graham cracker pie crust
1 1/2 cup fresh berries {I've made this using strawberries and blackberries - just a tip: if using blackberries, you may need more sugar than is listed unless yours are already fairly sweet}
2 Tbsp sugar

Directions:
Beat cream cheese in large bowl with mixer until creamy. Gradually add concentrate, beating well after each addition. Whisk in 2 cups cool whip; spoon into crust.
Refrigerate 4 hours or until firm. Meanwhile, toss berries with sugar. Refrigerate until ready to use.
Pipe or spoon remaining cool whip onto pie in whatever fashion you desire {you'll notice that in my photo I didn't desire any extra cool whip - I don't really think it needs it, but it does make it look prettier if that's what you're going for}. Top with berries.

Tuesday, May 1, 2012

Fruit Salad with a Honey Cinnamon Drizzle!!

Happy Tuesday everyone!! Hope you all had a great week! I went to Idaho and had a great time. Spent Saturday with Jessica! That was fun! For all you Idaho people who know this place we went to Big Judds Saturday night.... (it was my cheat on diet meal, cause i mean come on.. its Big Judds!!) I ate the burger so fast you would have thought its been months since i had a meal!
Anyway I am back to eating healthy and working out :) I told my mom last night that i am officially addicted to working out!! :) Im going every day this week except Friday cause it is date night :)
So i get back from Idaho yesterday and go to work out. Im debating on weighing myself, afraid of what the scale will say.... Well according to that scale Ive lost another pound!! So I have lost about 5-6 lbs now! I was in shock! I called Jessica to inform her that Big Judds didnt ruin everything! She was happy for me.

So for this competition we are all about at a tie right now of a weight loss of around 6lbs! So the pressure is building! Simon asked me last night what if we do not get to 20lb weight loss by July 1st... Im unsure of what we will do with the competition... extend the date? increase the lb limit to lose? I just dont know!

alright alright... I will get to posting a recipe now... Since you have all waited patiently for that delicious looking fruit salad I will post that recipe.

Fruit Salad with a Honey Cinnamon Drizzle


Ingredients
2 cups cantaloupe, chopped
1 cup strawberries, chopped
1 cup blueberries, chopped
2 kiwis, chopped
1 banana, sliced ( I did not put the banana in it. I was afraid if we could not eat it all the banana would go brown.)
1 cup honeydew melon
1 lime, juiced
1 tablespoon honey
1-2 teaspoons poppy seeds
dash of cinnamon (optional)
Directions
Combine cantaloupe, strawberries, blueberries, kiwis and banana in a medium sized serving bowl. Add the honeydew, lime juice and honey to your blender and pulse or purée until smooth.( I was very skeptical of pureeing the honeydew.. but wow!!)
Add poppy seeds and cinnamon and lightly pulse until combined.
Toss dressing with fruit.
Chill for 2 hours before serving.
For just two of us we had a ton left over... Ate it for breakfast the next day and dinner again.
You probably won’t have leftovers, but if you do…
Save them in the fridge for the next morning, and make a fabulous green smoothie! Add a cup of this salad to your blender, along with 2 cups of spinach and 1/2 cup cauliflower (optional). Add 8 oz. water and a few ice cubes. Push the smoothie button and enjoy! ( didnt have the ingredients to try this) 

This was a huge hit with my husband and myself. I am planning to make it for big gatherings and stuff to. Very very good! 


 Hope you all enjoy!! I have been cooking away and have many meals and things to share with you! Cant wait!! 

Tierra 

Wednesday, February 1, 2012

Strawberry & Cream Cheese Stuffed French Toast

This is the best stuffed French toast I've ever had. I'm rarely a fan because the toast is just soggy and mushy - so not good. But this stuff was good. It was tender inside {without being mushy}, had a nice crunch from baking and the caramel-y crunchy stuff on the bottom? Delicious! We made this for one of our mornings watching General Conference last October. It may just become a conference tradition.


Strawberry & Cream Cheese Stuffed French Toast
Recipe from Jamie Cooks It Up!
Time: 20 minutes prep + overnight refrigeration then 60-90 minutes baking
Yield: 10 servings

1 loaf french bread
1/2 C melted butter
3/4 C brown sugar
1/2 C corn syrup

8  oz cream cheese
1 egg
1/3 C sugar
1/2 C strawberry jam

8 eggs
1 C milk
cinnamon

Fresh Strawberries
Powdered sugar
1. Combine the butter, brown sugar and corn syrup.
2. Slice up your bread. You want the pieces to be about 1/2 inch thick.
3. Spray a 9x13 pan with cooking spray. Pour the butter/brown sugar mixture in the bottom of the pan.
4. Smooth it all out, so it covers the bottom entirely.
5. Lay your slices of bread on top of the buttery brown sugar. I had to cut some of my slices in half, still turned out great! You can have them touch each other, just not overlap.
6. In a separate bowl combine the cream cheese, egg, sugar and strawberry jam. Beat with hand held beaters (or in your stand mixer) until nice and smooth. Pour it right over the top of the bread.
7. Layer more bread over the top of the cream cheese filling.
8. In another bowl (ok, this takes a lot of bowls!) combine the 8 eggs and 1 C of milk. Whisk them around until well combined. Pour over the top of the bread.
9. Sprinkle the top of the bread with some cinnamon.
10. Cover and refrigerate overnight.
11. Bake in the morning at 350. Depending on how quickly your oven cooks, and how cold you keep your fridge you will need to bake it for 1 to 1 1/2 hours. It needs to soak up all of the egg and milk juice, and have time to caramelize along the bottom. Take the foil off for the last 15 minutes of cooking.
12. Serve with fresh strawberries and powdered sugar. You can also use frozen strawberries. This is the middle of the winter after all! Just be sure they have had a chance to thaw.
Enjoy!

Wednesday, October 5, 2011

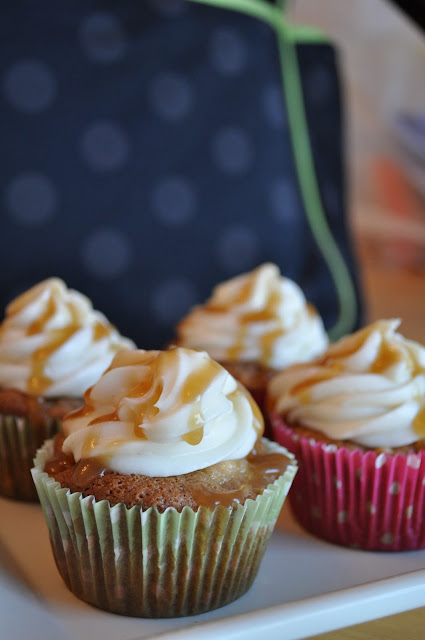
Caramel Apple Cupcakes

I have always loved cooking and baking.

I've always put the two together and said I loved them both. Probably equally.

But not anymore. I think I have finally decided that my favorite of the two is baking. It is so, so much fun!

As I told a friend recently, there are a lot of variables when it comes to baking. There are all kinds of things you can do differently that will change the outcome of what happens when you bake. There are also things beyond your control, like the way your oven heats, that also affect your baked goods. The best thing to do with those things beyond your control is to experiment and learn what you can do to still get what you want with what you've got. For example, in one of the apartments we have lived in, our oven heated too warm. We experimented and finally learned that the best way to get things to turn out the way we wanted was to turn down the temperature 25 degrees before baking. No more burning or over cooking. Perfect.

As far as variables that you can affect, there are all kinds of secrets out there about what to do/not to do for your baking to be a success. I won't pretend to be an expert on any baking secret, but I have found a few things that really help with baking.

Number one: people like shortcuts. They like cutting corners, taking the easy route, simplifying things. And, hey, I'm all about simplicity! Life is way too complicated as it is, no use making anything more complicated than it has to be. However, when it comes to baking, cutting corners is a bad idea. If a recipe says to add and beat eggs one an at a time, do it one at a time. I know, it takes a whole two minutes longer. Must save those minutes, right? Wrong! In baking, it really does make a difference. Pinky swear. Now, let me just say that I am almost the complete opposite when it comes to cooking. Experiment, change things up, do things differently, whatever! But when it comes to baking, just follow the recipe instructions.

Number two: margarine cannot always be used as a substitute for butter. I am a total advocate of saving money and I totally get that margarine is so much more affordable than butter. And I'll be totally honest and admit that I use margarine in place of butter almost any time I make cookies. But I also almost always use real butter in cupcakes and frosting recipes. It truly does make a huge difference.

Number three: mixing sugars and fats {i.e. - sugar and butter or sugar and oil} needs to be done thoroughly. While you're beating the two together, if you mix it long enough {sometimes it only needs a minute or less, but longer than just enough to mix them basically together}, you'll notice that the color starts to change. That's a good thing and it's what you want. I don't know the science behind it, but it creates wonderful things in your oven. Not all recipes need this much mixing, but every time I've done it this way, I end up with a better product.

That's enough "secrets" for today. Let's get on to these cupcakes, shall we? These cupcakes are so good. Seriously, I had about five different people ask me for the recipe within a couple days. I made two batches of these cupcakes within four days. They are just that good.


Caramel Apple Cupcakes
Recipe from Crazy About Cupcakes, page 53

1 cup firmly packed light brown sugar
1/2 cup vegetable oil
2 tsp ground cinnamon
1 Tbsp vanilla extract
2 large eggs
2 cups all-purpose flour
1 Tbsp baking powder
1/2 tsp salt
2 medium sized tart apples, peeled, cored, and chopped small


Directions:
Preheat the oven to 350. Insert liners into a cupcake pan.
In a large bowl (I use my stand mixer) beat together the brown sugar, oil, cinnamon, and vanilla with an electric mixer on medium speed. I usually mix it for at least a minute, or longer if it needs to be mixed more. Add the eggs one at a time, beating for one minute after each addition.
In a separate bowl sift together the flour, baking powder, and salt. I always sift in my first cup of flour and then add the baking powder and salt to the second cup to sift with the flour.
Slowly add the dry mixture to the wet mixture. I add about a 1/4 or 1/3 of the dry mixture at a time, mixing well after each addition. Beat until well blended (don't forget to scrape your bowl!). Stir in the apples.
Fill the cupcake liners one-half to three-quarters full with batter. Bake for 20-25 minutes or until a toothpick inserted in the center of the cupcakes comes out clean. Cool cupcakes in pan {I've tried cooling my cupcakes in an airtight container before to preserve the moistness, but I generally find that cooling them in the pan works just as well}.


To assemble Caramel Apple Cupcakes:
Once all your cupcakes have cooled, poke three holes in the tops of each cupcake using the handle of a serving spoon {it's best if your handle is nice and round so you get good holes}. Make up a double batch of Caramel Sauce {or do like I did and make one batch for pouring over the cupcakes and then another for drizzling - whatever your preference}. Pour the caramel sauce over each cupcake, being sure to fill up the holes really well. Once you've filled up each cupcake, go back and pour caramel sauce over them again. Did I mention that this isn't a cupcake for sissies? 'Cuz it really ain't. Yes, pouring caramel sauce over cupcakes twice might seem awful indulgent. But it is oh, so good! And somewhat necessary, that first round gets soaked up pretty quick. The second round gives it a nice soaking and really gives the cupcake that caramel flavor.
Now make up some Ginger Cream Cheese Frosting. Pipe it onto your cupcakes. Don't be stingy, now. Pipe it on nice and high {my husband keeps telling me that cupcakes don't need that much frosting. But come on! They look so awesome!}. If you'd like a little tutorial about piping frosting, check out Your Homebased Mom. She has a nice video tutorial with some good tips about cupcakes. Then spoon the remaining Caramel Sauce over the top of the cupcakes {I prefer to put the sauce into a squeeze bottle and drizzle it over with the small nozzle - this really gives me control of how my cupcakes look}. And lookie there - you've just made yourself a gourmet cupcake! Enjoy!

Wednesday, May 25, 2011

Strawberry Limeade

So on Monday I shared the recipe for Strawberry Sauce. And then I made you wait until today to get my new favorite thing to do with that sauce because we got to have our first recipe from Tierra yesterday! Wasn't she great? I'm super excited to try out her fruit salsa and I think I'm going to have to do it as soon as possible.

Now, I know this may not technically count as a "recipe". But I have measurements, I have ingredients and I'm gonna tell it to ya anyway.

If you really know me, you know I loooooovveee lime. Love lime. Like, I can never have enough lime love it. Like, I could put it on everything love it. Like, I do put it on everything love it. I buy bottles of lime juice like everyone else buys bottles of lemon juice. I always have limes in my fridge and the few times I've run out have been sad, sad days. Moral of the story: limes are awesome! And since limes are awesome and, let's face it, so are strawberries, combining them is about the best thing ever. So today I'm going to tell you how to make Strawberry Limeades. And then you should make them. You mustn't delay this very important and crucial part of your day.
You can thank me later. :)
Strawberry Limeade
Start to finish: less than 5 minutes {provided you already have your sauce made up}
Serving size: one lovely, tall glass

Ingredients:
1 cup lemon-lime soda
1/4 cup frozen limeade concentrate or fresh lime juice {or a little less if you aren't quite lime crazy like me}
2 Tbsp. strawberry sauce
Crushed ice, optional

Directions:
Pour the lemon-lime soda into a glass. Add strawberry sauce. Stir. Add limeade concentrate or lime juice. Add your crushed ice.
Then obtain a comfy lounge chair. Place it in a warm, shady spot outside and sip your limeade while dreaming about all things summery and delicious.
See all that frothy, tasty goodness? Doesn't it just make your taste buds tremble with desire for a taste. Mm, I think I better go make me some. :)

Tuesday, May 24, 2011

Tuesday With Tierra! (Fruit Salsa)

Fruit Salsa
By Cara Horton

While I was in Texas enjoying the nice warm weather in comparison to the weather we have around here, hehe, I got to help my sister-in-law make Fruit Salsa. Now just the name makes me kind of excited because I love fruit and am always up for new ways to eat fruit.
We made it for an appetizer for Mothers Day and I think i ate half the bowl!! (but its fruit so thats okay right?)
So I know now is the time for strawberries so thought I would post this and also even though it may not feel like summer, summer get togethers, like family reunions, are right around the corner!

Anyway, You will need:

Cinnamon Chips:
4 (7-inch) flour tortillas
1 tablespoon sugar
1/2 teaspoon ground cinnamon
Melted Butter

Salsa:
2 medium Granny Smith apples
1 cup strawberries, sliced
1 kiwi fruit, peeled and chopped
1 small orange
1 lemon
1/2 cup sugar give or take (this will be for taste, so as much or as little as you would like)

Heat oven to 400 degrees F.

For cinnamon chips, lightly coat with butter. Combine sugar and cinnamon in flour/sugar shaker; sprinkle over tortillas. Cut each tortilla into 8 wedges; place in single layer on cookie sheet. Bake 8 to 10 minutes or until lightly browned and crisp. Remove to cooling rack; cool completely.

For salsa, peel, core, and slice apples. Dice Apples into small pieces, you can use a food processor. Slice strawberries and chop kiwi, into small pieces. Place fruit in 1 quart bowl. Cut orange and lemon in half then squeeze the juice over the cut fruit. Add in the sugar to taste. Mix Well!

Serve with cinnamon chips.

This lasted for a few days. I learned that the citrus of the orange and lemon make it so the apple doesn't turn brown, hmmm interesting. I learn something new every day!

Enjoy!!
Thanks for joining me on my first recipe with Tuesday With Tierra! Come back next week for a great Dinner dish!

Monday, May 23, 2011

Strawberry Sauce

Have you ever heard of Our Best Bites? They are just about the coolest cooking blog on the planet. I aspire to be as cool {and talented} as them someday. I got this wonderful gem of a recipe from their site and it is so wonderful. I use it every time I have leftover strawberries that need to be used. It's is always perfect to use when the strawberries get a little soft and are no longer fun for just eating {or am I the only one who gets that way?}. I have made this several times and every time I am always glad I did. We love it as a syrup on pancakes or french toast, it would be so delicious on ice cream as a topping, and if you come back on Wednesday, I'm going to share my recent favorite thing to do with this sauce.


Strawberry Sauce
Recipe from Our Best Bites

Ingredients
1 pint {or two cups} strawberries
1/3 cup granulated sugar
1 tsp almond extract {which is amazing!} or vanilla extract

Directions:
Wash and remove the stems on the strawberries. I usually cut them in half at this point but according to the girls at Our Best Bites, this is an unnecessary step.
Combine the berries, sugar and desired extract flavor in a medium saucepan. Bring to a simmer over medium heat {as in, don't try to boil it but keep it hot}. Cook for five minutes, stirring and breaking up the strawberries constantly.
After five minutes, remove from heat and allow to cool. When the mixture is cool enough for your blender, add the mixture to your blender and pulse until it reaches the desired consistency. Or don't blend it up and have a syrupy strawberry mixture. Whatever floats your fancy.

This is my new favorite sauce to put on strawberry shortcake. Yummy!
I love leaving it with lots of chunks when I'm going to put it on pancakes or something. So tasty! But I like it smoother if I put it on something like strawberry shortcake or for the "recipe" I'm going to share Wednesday! And don't forget to check back tomorrow for the first recipe from Tierra!

Thursday, October 15, 2009

Strawberry Lemonade


This was an easy to make and super refreshing treat, especially when you can get the strawberries on season! Dan and I both really liked it. And you could easily substitute the strawberries for any berry of your choice if you should so desire.

Strawberry Lemonade
(makes 1 quart)

Ingredients:
1 container sliced strawberries
3/4 cup sugar
1 cup water {I liked it better with more water – I would use about 1 and ½ cups}
3/4 cup lemon juice {we did squeeze our own lemons for the juice but any lemon juice works just fine.}
2 cups ice cubes (can use less)

Directions:
In a blender process all ingredients until smooth. Drink immediately.

Monday, October 12, 2009

Strawberry Squares


Want a quick dessert? Want something everyone is bound to love? Make these! Seriously, they were so super yummy – I made up a pan of them for a family get together and even with just the few of us there they were the first thing finished! You won’t be disappointed. Warning: they are really, really sweet!

Strawberry Squares

Ingredients:
1 strawberry cake mix
2 eggs
1½ TBSP milk
1/3 cup oil
1 cup powdered sugar

Directions:
Preheat oven to 350. Mix the cake mix, eggs and oil together until stiff. Spread the dough evenly into a 9x13 pan. Bake the squares for 14-16 minutes. Mix the milk and powdered sugar. Drizzle the glaze over the squares. Serve warm or at room temp. {I added fresh strawberries to mine and it added a just perfect touch to something super sweet.}

Wednesday, July 22, 2009

White Chocolate Raspberry Cheesecake Bars

I made this cheesecake for Dan’s birthday and then again about a week later for a get-together with some friends. Even though I don’t like chocolate {yes, the truth finally emerges!}, I still really liked this cheesecake {I just didn’t eat the crust!}. I discovered after having this cheesecake that I really enjoy baked cheesecake, and probably even like it better than non-baked cheesecake. It’s not too difficult to make and it tastes and looks super yummy!


White Chocolate Raspberry Cheesecake Bars

Prep: 20 min – Total 4 hrs., 48 minutes
Makes 9 servings, 2 bars each


Ingredients:
12 Oreo Cookies, finely crushed
2 Tbsp butter, melted
3 squares white chocolate, divided
2 pkg. (8 oz. each) cream cheese, softened
½ cup sugar
1 tsp. vanilla
2 eggs
¼ cup red raspberry preserves

Directions:
Heat oven to 350 degrees. Mix cookie crumbs and butter {I just mixed mine right in the pan that you'll put it in - saved on dishes!};

press onto bottom of 8-inch square pan.

Melt 2 chocolate squares as directed on package.
Beat cream cheese, sugar and vanilla with mixer until blended. Add melted chocolate; mix well. Add eggs, 1 at a time, mixing on low speed after each just until blended.

Pour over crust.

Bake 25-28 minutes or until center is almost set.

Cool 5 minutes {this may be rather unethical, but I think it works better to be sure it's cooled and to make the preserves spread better if you put in the refrigerator for about 5-10 minutes - I didn't do that with the one in the picture and you can see it wasn't staying together very well - the refrigerated one worked without a cinch}; spread with preserves.

Melt remaining chocolate square; drizzle over cheesecake. Cool cheesecake. Refrigerate 4 hours. Cut into 18 bars.
Kraft Food and Family, Holiday 08/Winter 09 edition, pg. 35

LinkWithin

Related Posts with Thumbnails